Now go back to the Layers section. Important: Make sure you have the INKED layer selected, *not* the white back ground. Click Delete and deselect the line art.
This is the technique I use when I have colored lines in my Photoshop colored artwork. It's also the first step for when Iĺm making my sprites.
|
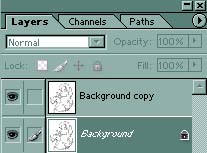
You're going to first want a duplicate of your image. Go Layers>Duplicate or click on the inked layer, and drag it into the New Layers icon, which is next to the trash can. |
|
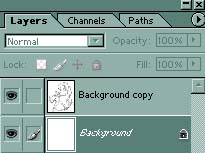
Select the bottom layer (Background Layer). Then go Edit>Fill and choose the color Ĺwhiteĺ. You should have a white background layer with an inked layer above it. |
|
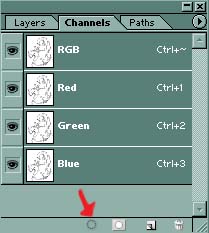
Next to the Layers tab you'll see another one for 'Channels'. Go to that section. And where the little red arrow is pointing in the example, click the small circle. It will automatically select all of the black in your image.
Now go back to the Layers section. Important: Make sure you have the INKED layer selected, *not* the white back ground. Click Delete and deselect the line art. |
 |
This is what you end up with. Youĺll notice that deleting the white area around him ate into his black lines a bit, making them look too thin. This is easily fixed, though. |
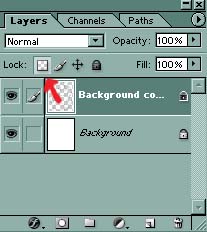 |
Lock in the transparent layer, as indicated by the little red arrow (This graphic may look different in older versions of Photoshop, but it should still be in roughly the same place.)
Choose the color Ĺblackĺ and with the biggest brush you can find, color over the entire area. This will thicken your drawingĺs lines back to the nice wide ones it had before. |
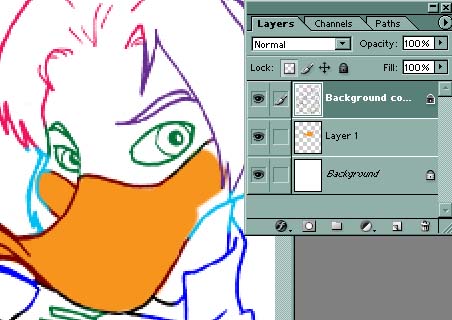 |
Now the fun part! After you've finished going over the image with black, you can now use other colors.
I personally like leave the inked lines black until I've colored the rest of the image, but you can change the colors of the lines at anytime,*and* still color underneath the inked lines as a layer. Here, Mithryn suffers the indignity of being a rainbow to demonstrate it for you. |