Part One: Prepping the Image--Using the Rectangle and Fill Tools
Okay, so you've got your image. You've got it cropped. Now what do you do with it?
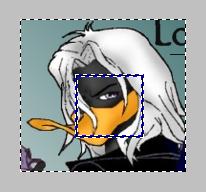
1. Select the Rectangle Tool. (On the Toolbar, it's the square graphic with the solid outline. This is NOT the same as the Rectangle Mask tool!) On the image that you cropped, draw an image that's as close to sqaure as you can get (assuming that you're aiming for square). You'll get something like this:
2. Now that you've got your rectangle created, click the Fill tool (looks like a paint can). By default this will usually be set to your Paint color, but it can also be a texture or bitmap. (my current one is Gold Metallic, as you can see.) For our purposes, it doesn't matter WHAT your fill is; it's just there for visibility. We'll be deleting this soon.
Click inside the rectangle you just created to fill it with a color.

3. Click Mask>Create from Object(s).
4. Click Mask>Invert. This will give you a lot of blinky lines similar to those on the graphic under #1.
5. Click the Object Picker tool (the arrow at the top of the Toolbar). This will automatically place a set of anchors--eight black squares--around the filled rectangle you just created. Right-click that rectangle, and then click Delete.
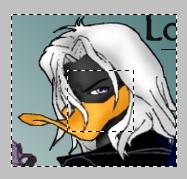
You'll notice that even though the filled rectangle is now gone, the mask you created from it still remains. We're now ready for the next step.
Applying the Filter and Creating a New Object