Making Oval Thumbnails with Borders using Photoshop 6.0

This is the same method I employed when I made the thumbs found in the Gallery at my Anatinea site. -Karla

After opening the image you’ll be thumbnailing, I recommend increasing it to its actual size(100%). This will make things much easier. Also make sure that it’s in RGB mode(Image/Mode/RGB Color), or you’ll run into problems.

Select the ‘Marquee Tool’, located in the narrow tool bar in the top left-hand corner. Right-click on it and select ‘Elliptical Marquee Tool’.

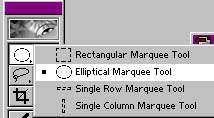
You’ll notice a new tool bar across the top. Go up and change the ‘Style’ to ‘Fixed Size’, then enter in the width and height that you want. For this tutorial, I’ll be using 75px width by 50 px height. If you want perfect circles, just keep both the same size(ie 50px by 50px).

Click on the image. You should now have a fluttering outline with the dimensions you entered. Drag the outline to where you want the thumbnail.
Right-click and when the menu pops up, go to the bottom and select ‘Stroke...’ . Enter in the width you want, white as your Color, and Center as the location.

THIS IS VERY IMPORTANT. If you don’t do this, then the colours of your image will bleed through the border, altering the colour. You‘ll notice it when you put it up onto your site, especially if you’re making more than one.


Repeat the above step, but this time, change the colour to the one you want the border to be. Change the location to ‘Inside’.
Repeat the step again, and change the colour to match your site’s background colour. (Or, if you’re using a background image, a colour as close as possible. Because my site is dark purple, I chose black). Change the location to ‘Outside’.

Right click once more, and choose ‘Deselect’. This will get rid of the marquee outline.

Whoot! The thumbnail is made! But wait, you still have to cut it out...

Choose the ‘Crop Tool’ and go around your thumb, getting the edges as close to the inside border as possible without going over. Even if you’re not touching the ring, that’s fine.

Crop the thumb.

Now zoom in, to about 600x. Repeat the last step, this time bring the ‘Crop’ edges right up against the sides, top and bottom as shown. Crop it.

Go Layers/Duplicate Layer. Click OK.

On your ‘Layers’ menu bar, click on the bottom layer. Then go Edit/Fill. (Make sure when the menu pops up, that the Contents says "Background Color" and that your Background colour is some colour that won’t get mixed up with the colours of your thumb. Such as bright lime green or super hot pink.)

Go back to the ‘Layers’ menu bar and click on the top layer.

Choose the ‘Eraser Tool’ and using the second smallest eraser, go around the thumbnail, making sure you don’t go right up against the thumb itself. Doing so will cause the thumb to look jagged, exactly what we’re trying to avoid. Don’t worry if the outside line isn’t completely gone; it will blend in with your site’s background(image).

Go back to the ‘Layers’ menu bar and right-click. Select ‘Delete Layer’ and click ‘Yes’.

The pink (or whatever color you’re using) background should completely disappear, leaving you with your thumb on a checkered background.

Save the thumb as a .GIF, making sure the ‘Transparency’ is check-marked when the ‘Indexed Color’ box pops up. If it’s not, and you save, you’ll get a white box around your thumbnail.

And there you go! A lovely bordered oval thumbnail. Enjoy!

Back to Tutorials