
Now use the ‘Magic Wand’ to select the black area.


Now go Filter>Noise>Add Noise and set it to 60 and ‘Gaussian‘. Then go Filter>Blur>Gaussian Blur and set it to 2.0. The image should now look like this.
|
Here's our starting out image. Nothing fancy at all. First, set Image>Mode to ‘Grayscale‘.
Now use the ‘Magic Wand’ to select the black area. |
|
Choose Filter>Pixelate>Crystallize and set it to 10. The image should now look like this. |
|
Go CTRL + SHIFT + I and invert the selection. Using the ‘Magic Wand’ and holding down the ALT key, select the inside areas like the center of the ‘O’s. Deselect it so it won't have noise added during the next step.
Now go Filter>Noise>Add Noise and set it to 60 and ‘Gaussian‘. Then go Filter>Blur>Gaussian Blur and set it to 2.0. The image should now look like this. |
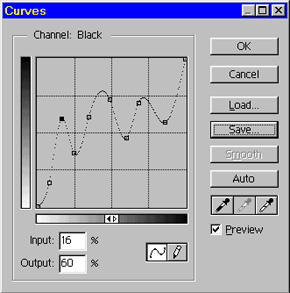 |
Now for the tricky part. Go Image>Adjust>Curves. Try tweaking it around so it looks close to the image just below, minus the icicles. To the left is what I used for the example image. |
 |
Next, rotate the image 90° CCW and go Filter>Stylize>Wind (from left).
Rotate it back 90° CW. Looking better... |
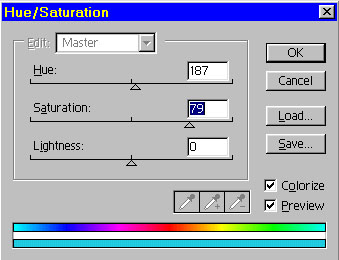 |
Convert the image to RGB color (Image>Mode>RGB). Go Image>Adjust>Hue/Saturation and play around. At left are what I selected for ice tones. |
 |
And here's the finished image, touched up a bit with some sparkly brushes that come free with Photoshop.
(Photoshop directory)/Goodies/Brushes/Misc) |